BUDGET DEVELOPMENT REPORTING SYSTEM
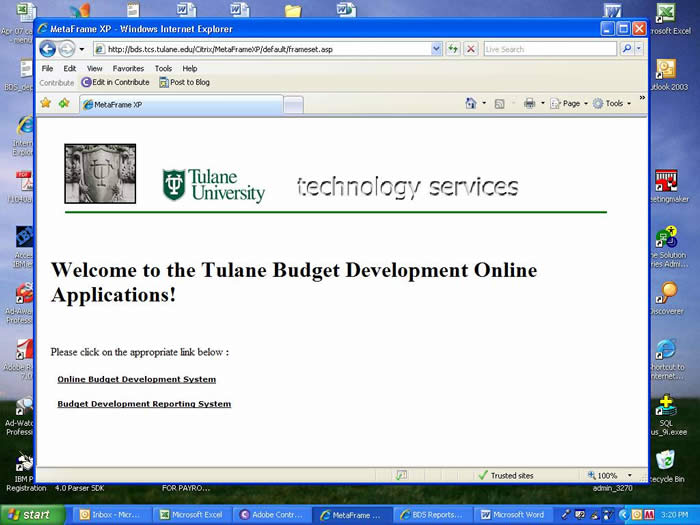
The "Budget Development Reporting System" is accessed from a link on the BDS "Welcome" web page (See Fig. Q-1, below). The system uses Crystal Reports to generate "formatted" reports and/or download budgeted salary and non-salary information for your TAMS Organization number(s). When you have completed your use of the Reporting System, use the Sign Out link to exit the system.
Figure
Q-1: Welcome to the Budget Development System Applications! Screen
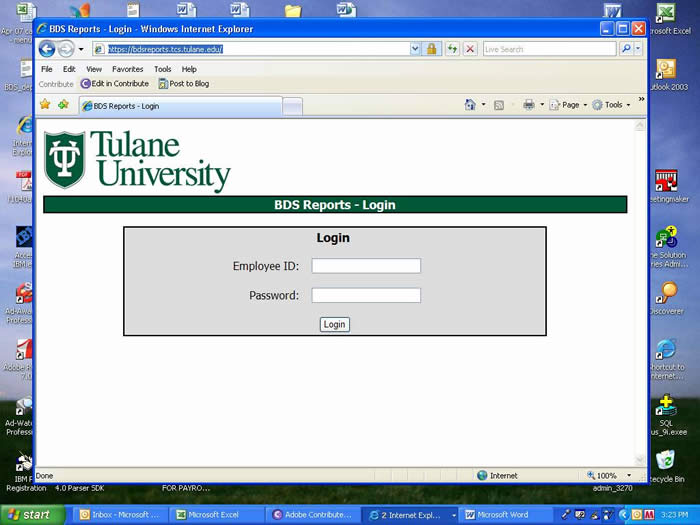
Use your mouse to click on the "Budget Development Reporting System" link. You will see "BDS Reports-LogIn" page (See Fig. Q-2, below) in a separate browser session. This enables you to be logged into both the Online and Reports sessions at the same time. Any changes you make in the Online session can then be seen on any report/download produced in the Reports session.
Figure
Q-2: BDS Reports LogIn page
To log in do the following:
- Type your Employee ID (currently your SSN)
- Type your BDS Password in the "Password" field
You will see BDS Reports - Menu page (See Fig. Q-3, below).
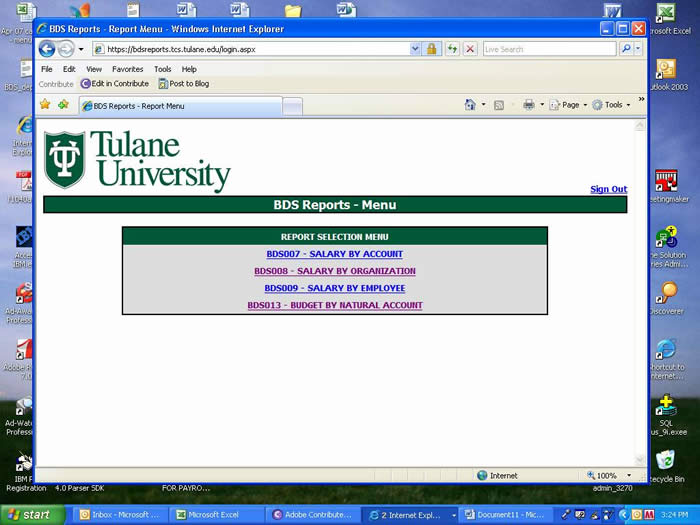
Figure Q-3: BDS Reports Menu page
There are 4 reports that can be generated by the system. You can generate one report and return to the report menu to select a different report. Just use the "Report Menu" link in the upper right of the page.
Think of these reports in terms of the Online BDS screens they represent. However, you can generate a report for multiple accounts or organizations:
- BDS007 - SALARY BY ACCOUNT is used to re-create Screen 200. The generated report can show you the employees budgeted on the account(s) selected.
- BDS008 - SALARY BY ORGANIZATION is used to re-create Screen 100. The generated report can show you the employees budgeted on the accounts within the organization(s) selected.
- BDS009 - SALARY BY EMPLOYEE is used to re-create Screen 400. The generated report can show you the employees within the selected home organization(s) budgeted on any accounts.
If you chose either the BDS008 or BDS009 report, you will see a selection screen like the one at Fig Q-4 below.
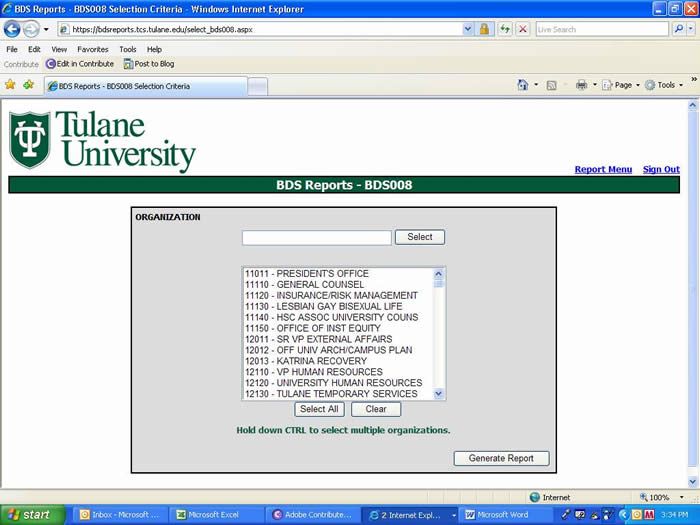
Figure Q-4: A BDS Organization Reports Selection page
The list displayed on this page will be for all your authorized access organizations. The entry field to the left of the 'Select' button will allow you to search the list for the organization(s) for which you want to generate a report. You can enter the organization's 5 digit number or some portion of the number and press the 'Select' button. The list will place that organization at the top of the list. Or, you can use the scroll bar to the right of the list and scroll through to the desired organization(s).
- If you want to report on one organization, use your mouse to highlight the organization. Use the Tab key to highlight the 'Generate Report' button and press the Enter key, or, click on the 'Generate Report' button.
- If your list of authorized organizations is short, you may press the 'Select All' button. This will highlight all the organizations. (The 'Select All' button will be disabled if you have access to organizations whose total number of accounts exceed 1,000 accounts.) Use the Tab key to highlight the 'Generate Report' button and press the Enter key, or, click on the 'Generate Report' button.
- If you want to report on multiple organizations and they are numbered sequentially on the list, you can use your mouse to highlight the first one, continue to hold the left mouse button down and drag the mouse to the last organization you wish to select. Use the Tab key to highlight the 'Generate Report' button and press the Enter key, or, click on the 'Generate Report' button.
- If you want to report on multiple organizations and they are not numbered sequentially on the list, you can use your mouse to highlight the first one (if necessary, use the search process described above to find the next organization), hold the control (CTRL) key down and use your mouse to highlight that organization. Repeat this process until all desired organizations have been highlighted. Use the Tab key to highlight the 'Generate Report' button and press the Enter key, or, click on the 'Generate Report' button.
- Clicking the 'Clear' button will cancel the current selected organizations(s).
If you chose either the BDS007 or BDS013 report, you will see a selection screen like the one at Fig Q-5 below.
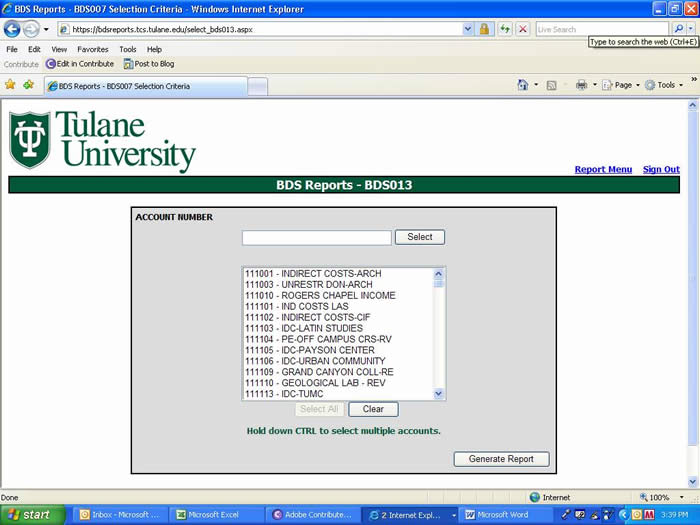
Figure Q-5: A BDS Account Reports Selection page
The list displayed on this page will be for all accounts assigned to yoiur access-authorized organizations. The entry field to the left of the 'Select' button will allow you to search the list for the account(s) for which you want to generate a report. You can enter the account's 6 digit number or some portion of the number and press the 'Select' button. The list will place that account at the top of the list. Or, you can use the scroll bar to the right of the list and scroll through to the desired account(s).
- If you want to report on one account, use your mouse to highlight the account. Use the Tab key to highlight the 'Generate Report' button and press the Enter key, or, click on the 'Generate Report' button.
- If your list of authorized accounts is short, you may press the 'Select All' button. This will highlight all the accounts. (The 'Select All' button will be disabled if you have access to more than 1,000 accounts.) Use the Tab key to highlight the 'Generate Report' button and press the Enter key, or, click on the 'Generate Report' button.
- If you want to report on multiple accounts and they are sequentially numbered on the list, you can use your mouse to highlight the first one, continue to hold the left mouse button down and drag the mouse to the last account you wish to select. Use the Tab key to highlight the 'Generate Report' button and press the Enter key, or, click on the 'Generate Report' button.
- If you want to report on multiple accounts and they are not numbered sequentially on the list, you can use your mouse to highlight the first one (if necessary, use the search process described above to find the next account), hold the control (CTRL) key down and use your mouse to highlight that account. Repeat this process until all desired accounts have been highlighted. Use the Tab key to highlight the 'Generate Report' button and press the Enter key, or, click on the 'Generate Report' button.
- Clicking the 'Clear' button will cancel the current selected account(s).
The report generated will look like the one at Fig Q-6 below.
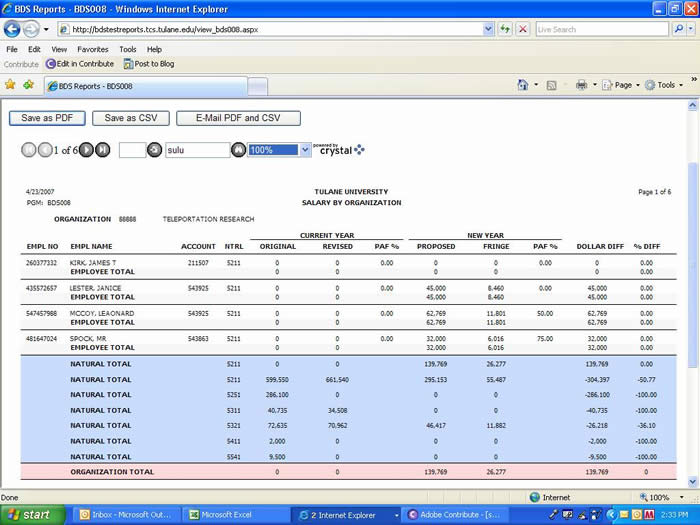
Figure Q-6: A Reporting System generated report page
The BDS007 report is generated in account number order, with the employees sorted alphabetically by last name. Summary pages will include account, ledger and natural account totals.
The BDS008 report is generated in organization number order, with the employees sorted alphabetically by last name. Summary pages will include account, ledger and natural account totals.
The BDS009 report is generated in organization number order, with the employees sorted alphabetically by last name. No summary pages are included in this report.
The BDS013 report is generated in account number order sorted by natural account. Summary pages will include account, ledger and natural account totals.
There are 3 ways to browse a report:
a.) Use the 'Arrow' buttons in the upper left hand corner of the report screen to move through the report.
b.) Use the 'Go To' button to the right of the 'Arrow' buttons to select a specific page in the report.
c.) Use the 'Search' button to the right of the 'Go To' button to search for text within the report.
The field next to the 'Search' button allows you to change the text size of the report.
The Reporting System will
allow you to save documents in a spreadsheet format (.csv) or a printable format (.pdf) using Adobe Acrobat Reader. You may also e-mail copies of both formats to yourself. Naturally, you
must have an Email address with the extension of @tulane.edu to
use this feature. Please contact the Help DESK
at 862-8888 to get assistance
in establishing an e-mail account and to setup Email software to your computer.
Use the 'Save as PDF' button to save a report in a printable (.pdf) format or the 'Save as CSV' button to save the report in a spreadsheet (.csv) format. A File Download dialogue box, such as the one in Fig. Q-7 below, will appear and you should press the 'Save' button. Then the "Save as" dialogue box will appear, Fig. Q-8 below.
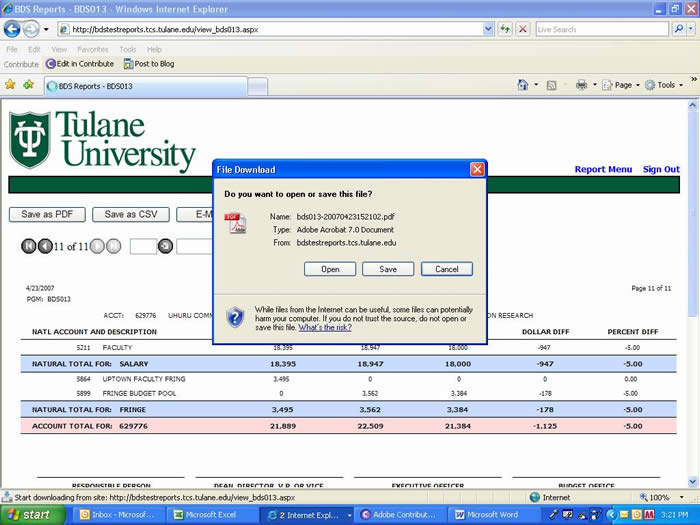
Figure Q-7: File Download dialogue box
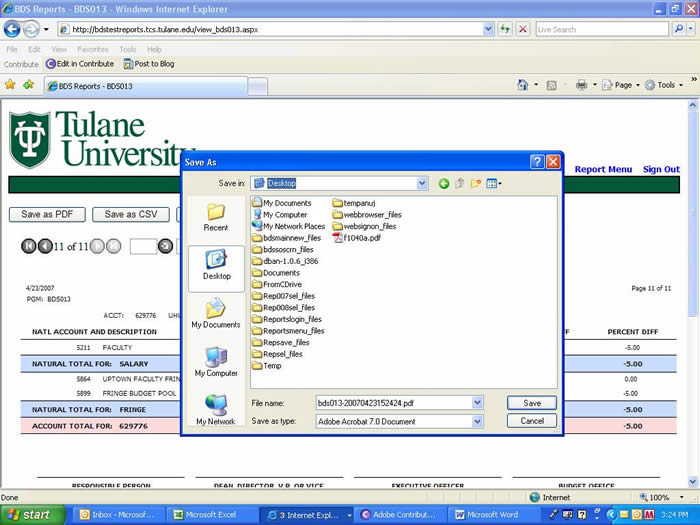
Figure Q-8: Save as dialogue box
Do not change the "Save as" type (e.g., Adobe Acrobat X.X Document or Microsoft Excel Comma Separated Values)! You may want to change the "File name" and/or the "Save in" parameters. Press the "Save" button on this dialogue box to complete the process.
Use the Email PDF and CSV button to e-mail the report to yourself. When you press this button, no dialogue box will appear and the report will be sent to your current "@tulane.edu" address.